


One of the many great in built features of Magento is the multi store architecture. Here we see how to setup magento multistore and how to manage it in detail. Magento allows you to create not just one online store but as many as you require. Magento multi store management is so scalable that you can apply separate themes as well as currencies and customer base to each different store. It works like a separate entity altogether. You can also combine multiple stores to share customer or product information or you can keep them separate. Magento provides language integration support to display stores in regional languages for better customer support.
It may sound like a complex task and a lot of management involved, but Magento multi store management is really simple and easy to implement and administer. In this article I will describe how anyone can implement multiple stores in Magento. All you need is a working Magento store and basic knowledge about Magento administration. For the sake of safety I’d advise you first try it out on your local setup and then transfer it to a live store.
To better understand the native hierarchy of multiple stores you must understand a few terminologies that go with it.
Website: A website is a collection of multiple stores and store views that share customer and shopping cart information.
Store: A store is a sub division of a website. It is a logical collection of one or more store views. A website can have multiple stores. All the stores share the customer, catalog and order information.
Store view: One store can be set up to look and feel differently through store views. Just as the name suggests ”“ one store many views.
Combine all of this and you get a powerful structure of store management that is fit to serve the needs of any type of business anywhere in the world. For more detailed information about Magento multi store website structure refer to this article. We’ll go through each step starting from creating a new store to activating customized themes for each store view. Let’s get set, ready, go!
- Add category
There is one root category in a freshly installed Magento instance. If you want to provide separate catalog for each of your websites then you will need to create separate root categories for each of your websites. If you wish to share catalog information among the stores then no need to create additional categories. We can use the root category. For the sake of this example, we will create a new category from Catalog->Manage categories and click on Add root category.
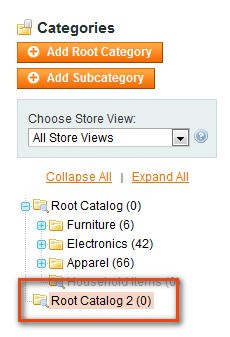
This new Root Catalog 2 can be used with the new website we create. If there are 4 new websites then we’d have to create four root catalogs each with their own sub categories.
- Store configuration on back-end
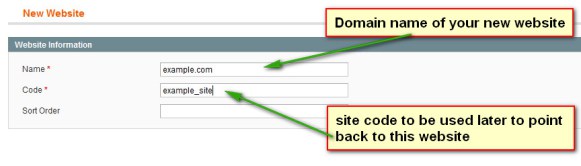
Once we have created a new product catalog, it’s time to create a new store to apply that catalog. Go to system->Manage stores->create website and enter new website details.
Now add a store to this new website. So click on Create store button and create a new store under example.com
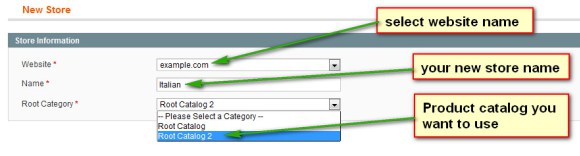
You can select which product catalog you want to use with this store. It can be an old catalog or the new catalog that you have just created. Click on Save.
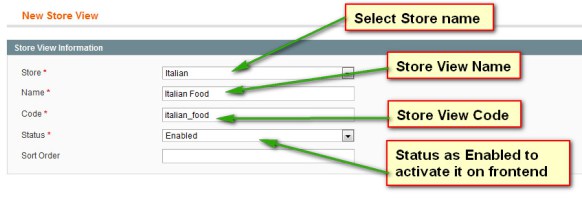
One more step to finish is creating a store view. A store view is the frontend that your customers are going to look at, when they see your site. Click on Create Store View and fill in the details as shown below:
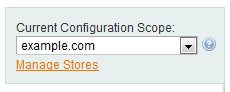
Once we have created a new website and stores in it we have to set the URL for that website. Go to System->Configuration and select the proper website from the top left corner. This is to make sure that we are setting the Base URL for the right website.
Select General->Web and on the right side change the base URL of our example.com store

That’s it! Our backend configuration is done. You can repeat the same process to add as many websites, stores and store views you want in your store. Now we’ll have to set up the store from the server side.
- Configuration on the server side
Go to your Apache configuration file httpd.conf and write the code to point our new domain to the store’s root. The code is:
ServerAdmin webmaster@example.com
DocumentRoot /your_magento_root/
ServerName example.com
Edit your store’s .htaccess file and add the following code:
SetEnvIf Host www\. example.com \.com MAGE_RUN_CODE=example_site
<pre>SetEnvIf Host www\. example.com \.com MAGE_RUN_TYPE=website</pre>
<pre>SetEnvIf Host ^ example.com \.com MAGE_RUN_CODE=example_site
SetEnvIf Host ^ example.com \.com MAGE_RUN_TYPE=website
Restart your Apache server and clear your cache. Re-index all your indexes.
- Magento multi store management
Once you have created the stores you can specify separate catalogs, unique themes and other configuration changes to each store as per your requirement. For that you just need to keep in mind that when you are applying any configuration settings, set the configuration mode to the particular website or store to which you are changing the settings.

Default: General settings for all websites, stores and store views.
Example.com/Main Website: Settings specific to a website
Italian/Main Store: Settings specific to a store
Italian Food/English/French/German: Settings specific to store views
It sums up about the basic configurations for Magento multi store architecture. You can also set specific languages and currencies for each stores/websites. Keep this blog bookmarked for updates on that topic. If the steps are not working properly.
Let us know if you need any help here.
"A brief article on setting up and implementation of #Multistore in #Magento" Click To Tweet
it from somewhere? A theme like yours with a few simple adjustements would really make my blog jump
out. Please let me know where you got your theme.
Kudos
My blog post ... <a href="http://www.die-Seite.com/index.php?a=stats&u=pearlinenolan" rel="nofollow">www.die-Seite.com</a>
We have two different websites with two different stores. However, if a customer sign-up to both stores with the same email address, in their account it shows their orders for both stores if they are logged into one of the specific stores.
How do I get, them to see only the orders of that specific store and not all?
It seems like you have setup multi stores improperly. Default Magento shows orders separately for each stores even if multi stores have been setup. Make sure you have set up different stores and websites rather than only store view while setting up multi store. Let us know with detailed query if still problem persists.
We have checked your site and the problem you are facing with the current multi store setup. Digging deeper, we have nailed the solution to redirect the site to top indexed page rather the one visited lastly.
Login to your admin panel, go to System->configuration. Find “Web†tab from left sidebar. Here you will find various settings from which click “Session Cookie Management†settings and set the option “Cookie Lifetime†to “0†(zero).
This is the only solution you can implement to make the topmost index page the absolute default when you just enter the domain name. But implementing this solution may pay you a loss of user experience as clearing the cookie will clear customer’s shopping cart as well.
Furthermore, we need your admin details to provide you with exact solution.
Feel free to ask us any time, we are always there to help you out.
Thank you
does this also work in subdirectories. I want to set up a second website in a subfolder of my main domain
Thanks
Validate your login
Sign In
Create New Account